Google is introducing the next generation of Analytics, Google Analytics 4. (GA 4) From 01 July 2023, standard Universal Analytics properties will no longer process data.
You will be able to see your Universal Analytics reports for some time after 1 July. However, new data will only flow into GA 4 properties.
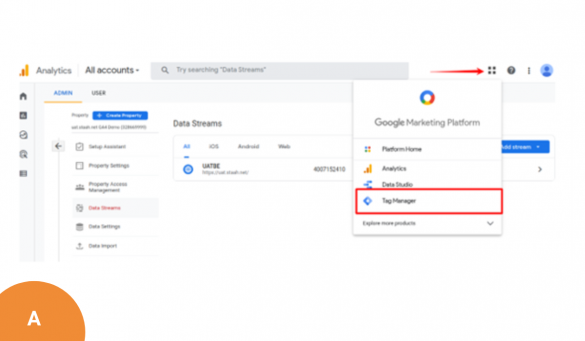
STAAH is GA 4 ready across our booking engines. Contact your web developer to install GA 4 with Google Tag Manager.
To get started
- Contact your web developer to install GA 4 with Google Tag Manager.
- We have prepared a setup guide to assist. You may want to share with your web developer.Provide Google Tag Manager ID to your STAAH designated Partner Services team member to configure in channel manager.
Prepare and be ready for 01 July 2023
Contents:
1. Install GA 4 with Google Tag Manager
2. Create a GA 4 property and a data stream
3. Debug view in GA 4
4. Publish your changes in Google Tag Manager
5. GA 4 Realtime Reports
6. Google Tag Manager Setup
7. Cross-Domain Tracking
8. Quick guide to setup GA 4
1. Install GA 4 with GTM
A) Create a GA 4 property and a data stream
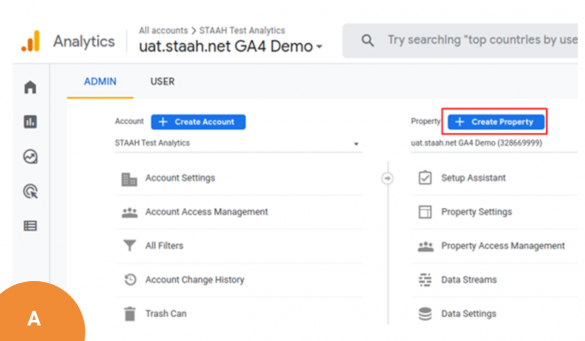
If you want to create a new GA 4 property, go to the Admin section of your Google Analytics interface (by clicking the Admin at the bottom-left corner) and then (in the Property section) click Create Property.
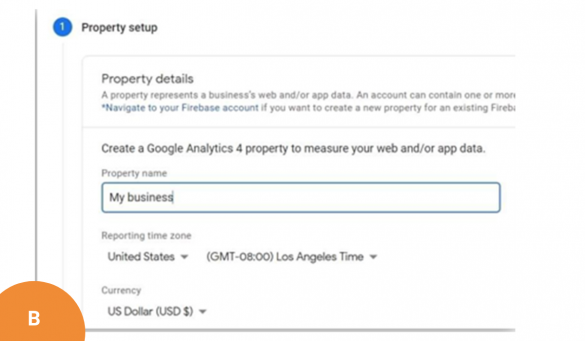
Then enter the name of your property. It might be the name of your website, of your company, a brand etc. Choose your company’s country, reporting time zone, and the main currency that your business operates in.
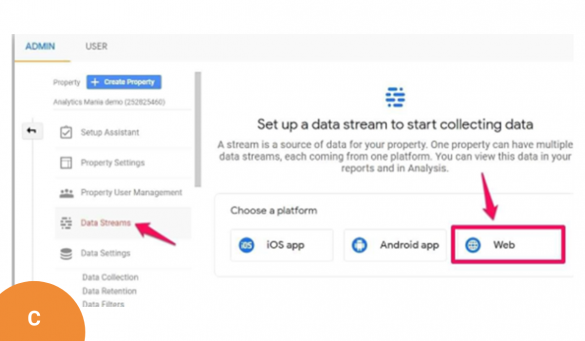
B) Then press Next, and answer several questions, click Create and your new property will be ready. The next step to complete is to configure your first data stream. It is a data source from which events will be sent to your Google Analytics 4 property. You can have multiple data sources in a single property. For example, 3 web properties, 1 for Android app and 1 for an IOS app.
We are going to setup Web stream. Select Web stream.
C) Then enter the URL of your website (for example, https://www.mywebsite.com). Note, that the protocol (https) is already selected. After that, enter the name of your website.
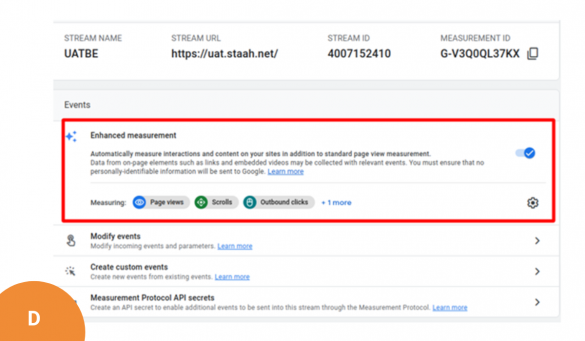
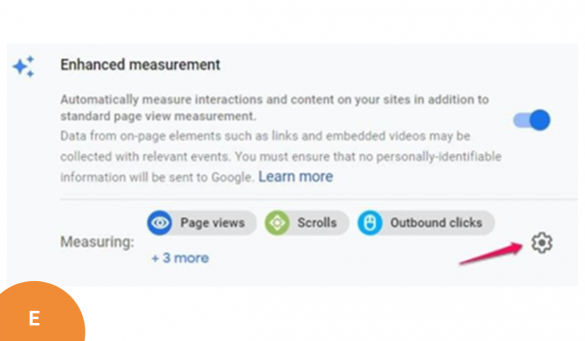
When you create a web data stream in GA 4, you have the option to enable/ disable Enhanced Measurement. It is designed to help marketers get as many events in the reports as possible without the need to cooperate with developers or configure them in Google Tag Manager.
D) By default, this feature is enabled and will automatically track the following events:
- Page view (event name: page_view)
- Scroll (event name: scroll)
- Outbound link click (event name: click with the parameter outbound: true)
- Site search (event name: view_search_results)
- Video Engagement (events: video_start, video_progress, video_complete)
- File Download (event name: file_download)
E) If you want, you can disable/ enable events individually. You can do that by clicking the gear icon in the Enhanced Measurements section and then clicking toggle buttons.
When you are ready, press the Create stream button.
2. Create a GA 4 property and a data stream
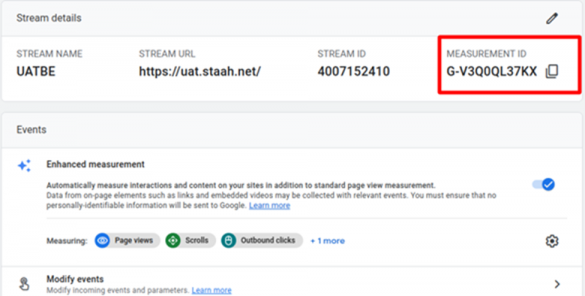
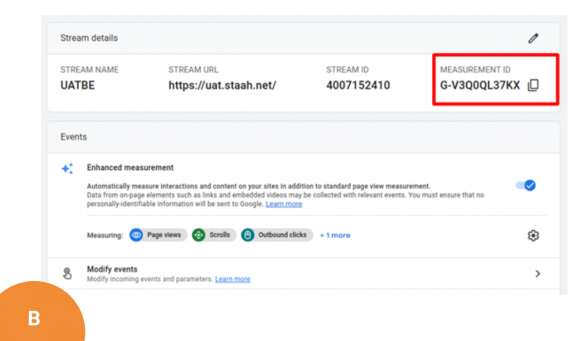
A) When you create a data stream (web), you will see a Measurement ID. It is at the top-right corner. You will need to use it in Google Tag Manager.
B) If you ever get lost in the GA 4 interface and you need to revisit this page, go to Admin > Data Streams > choose your most recent created stream, and then you will return to the same window that is displayed in the screen shot above.
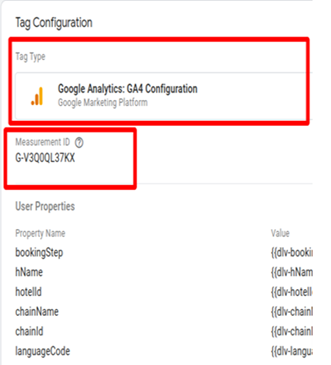
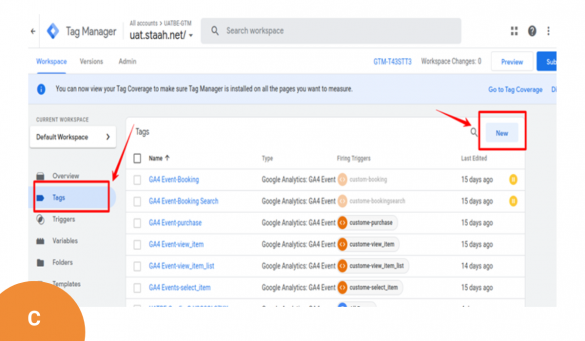
Then go to your GTM container > Tags > New and choose GA 4 configuration.
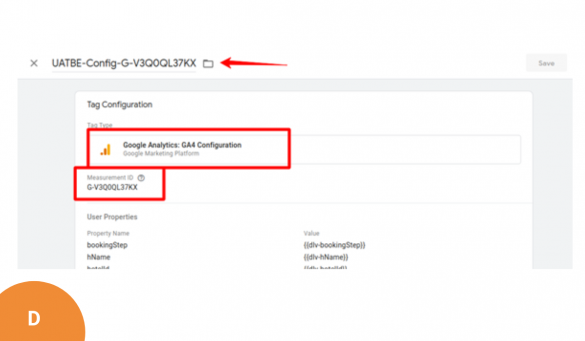
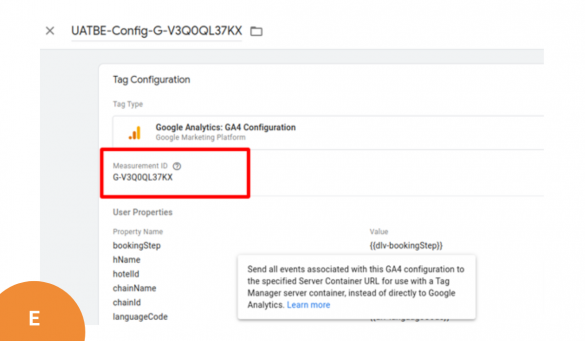
In the Measurement ID field, enter the ID that you copied in the GA 4 interface. Keep the Send a page view event when this configuration loads if you want to automatically track pageviews.
Usually, it is not a problem to keep it enabled but, in some situations, e.g. on single-page applications, it is more recommended to disable the pageview checkbox and create just a standalone configuration tag.
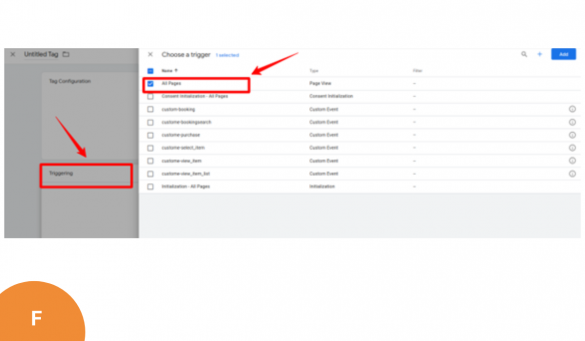
In the Triggering section, select All Pages and then name the tag, e.g GA4-Pageview
3. Debug view in GA 4
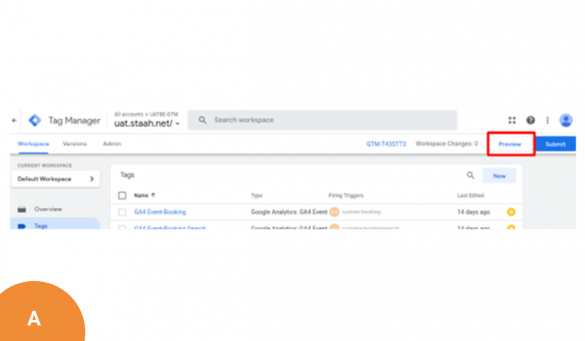
A) Enable the GTM preview mode to test your changes.
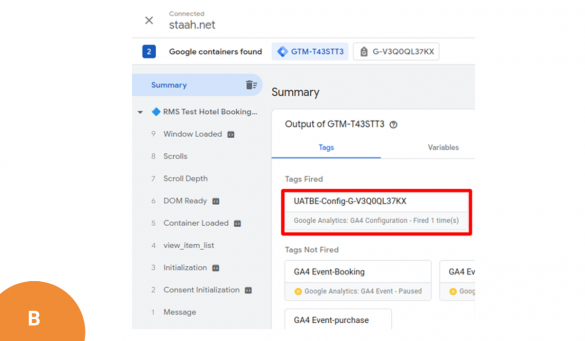
B) Once you enable the preview mode, you should see the new GA 4 tag among tags that fired.
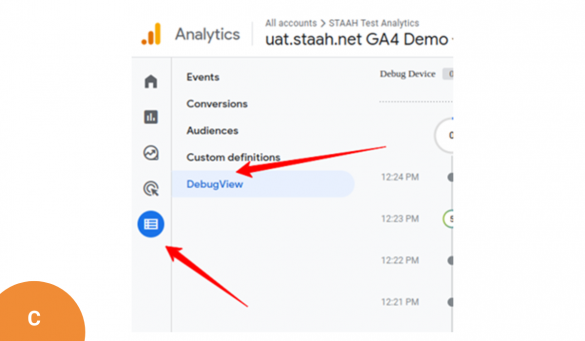
C) Once you configure your events, it is time to test them. The primary feature built for debugging GA 4 data is the DebugView section. You can find it by going to Configure.
Debug view on the left side of the GA 4 interface. Click on it. Data in the Debug View is visible ONLY when the debug mode in GA 4 is enabled.
With Google Tag Manager, having the GTM Preview mode enabled, the data will start appearing in the GA 4 DebugView.
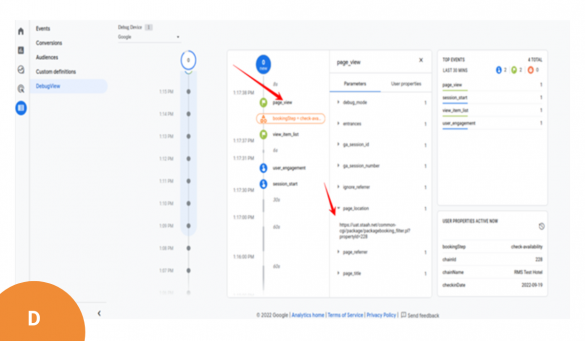
D) When you start seeing data in the DebugView, you can click on every individual event and then a list of parameters will be displayed.
Click on that parameter to see the value that was received by GA 4.
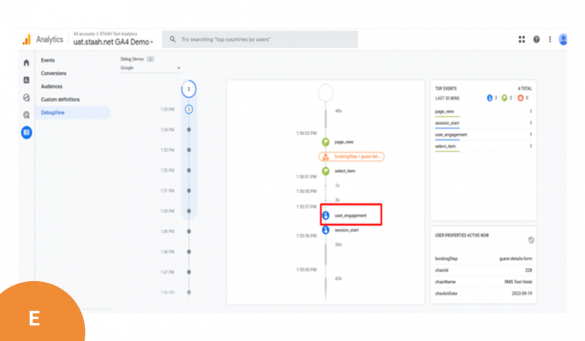
E) If multiple visitors have enabled the debug view, you will see multiple devices there and it might require some time to find yourself.
Once you start seeing data in DebugView, things will look like this.
4. Publish your changes in Google Tag Manager

Once you made sure that the data is coming in and it is displayed property, you should submit your GA 4 changes in the GTM container and publish it.
You can do that by clicking the SUBMIT button in the top right corner and then complete all the other steps that the user interface asks you to do.
After that, you should soon start seeing the new data coming in your real-time reports as well.
5. GA 4 Realtime Reports
On the left sidebar of the GA 4 interface, go to Reports > Realtime. This is where you will see the data coming into your reports. Unlike in the previous version (Universal Analytics), the new report offers you capabilities to see the data on a much more granular level.
First, you will see a map and a bunch of cards with traffic sources, most popular events, and the number of users in the last 30 minutes (by the way, Universal Analytics real-time report shows the number of users in the last 5 minutes).
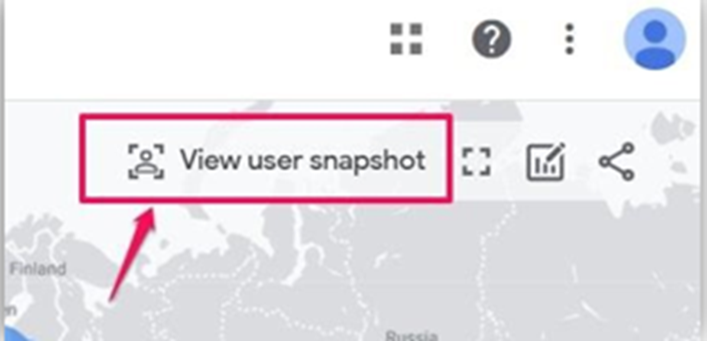
You can also take a look at the snapshots of an individual user. You can do that by clicking the View user snapshot button in the top right corner.
6. Google Tag Manager Setup
A) The simplest approach to configure your Google Tag Manager container is to utilize our per-config JSON import file, which streamlines the process by importing and auto-generating all of your GTM container’s tags, events, and variables.
Note: If you are using an existing Google Tag Manager account, we strongly recommend that you publish all changes and export a backup of your current container before proceeding.
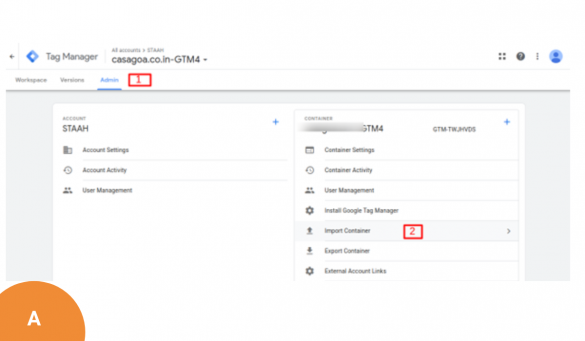
B) Open Google Tag Manager Admin.
-Navigate to Admin > Container > Import Container.
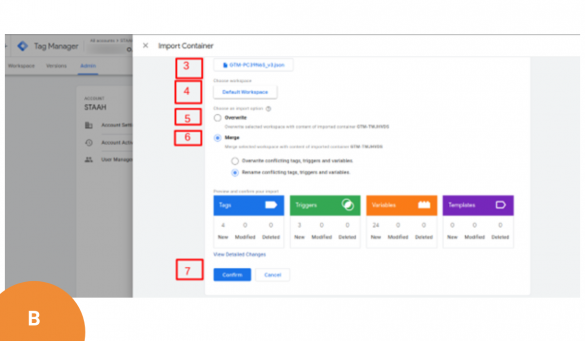
Click Choose container file and select the JSON file(GTM-STAAH_enhanced-ecommerce.json).
-Under Choose workspace, click Existing or New (Enter a title and description, then click Save).
-Select one of the following actions to import the file:
The Overwrite option should be selected for the new container. The Merge option should be selected is you are using an existing container. Click Preview to review the tags, triggers, and variables.
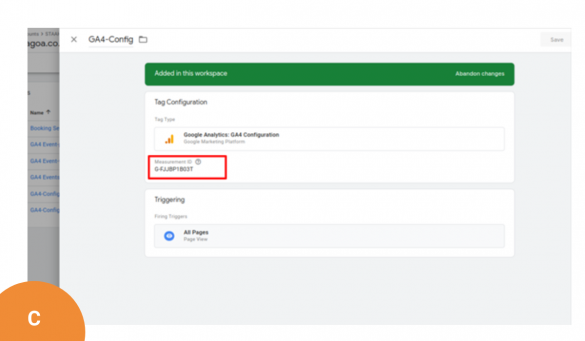
C) To edit the Google Analytics: GA4 Configuration that is referenced in Tags, do the following:
Navigate to Tags
Choose “ GA4-Config”. Then, update the Measurement ID with your own Measurement ID.
Click Confirm when complete.
Follow Google’s instructions to publish the new container.
7. Cross Domain Tracking
A) If you would like to track different websites that belong to the same domain (e.g.blog.yourwebsite.com and www.yourwebsite.com), GA 4 will handle this automatically.
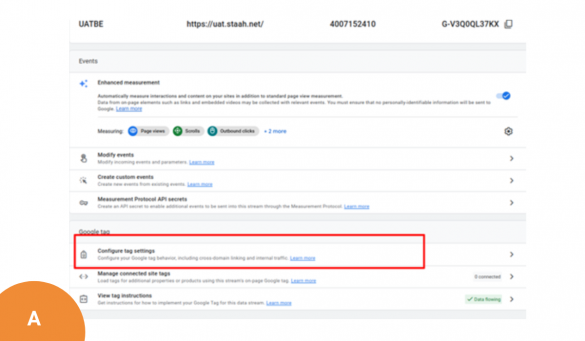
- Go to the Admin of Google Analytics > Data Streams and select web data stream
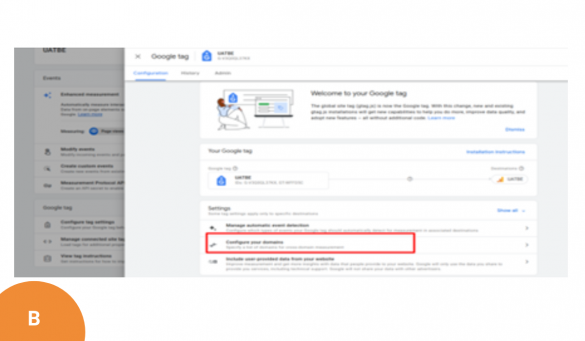
- Go to Configure tag settings
B) Click Configure your domains
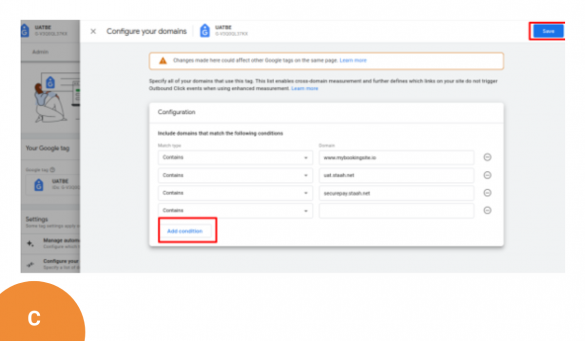
C) Enter all domains that are to be included in the cross-domain tracking setup. Then hit save.
Below are the domains that are to be added:
IMPORTANT: If you have white-labeled your booking engine, please add your domain name
CSBE (MyBookingSite Booking Engine)
- mybookingsite.io
- securepay.staah.net
INSTANT (Instant Convert Direct Booking Engine)
- secure.staah.com
- securepay.staah.net
MAX (MAX Booking Engine and Follow The Eye Booking Engine)
- maxbe.staah.net
- ftebe.staah.net
8. Quick guide to setup GA 4
A) Create a GA 4 property
B) Take note of the Measurement ID from Google Analytic property setup
C) Navigate to your GTM account and the click on the ‘New tag’ link:
D) Name your new tag, example GA4-Config and set the tag type to ‘Google Analytics: GA4 Configuration’
E) Enter the measurement ID you recorded earlier in the ‘Measurement ID’ text box:
F) Set your trigger to fire on all pages:
Click on the ‘Save ‘ button
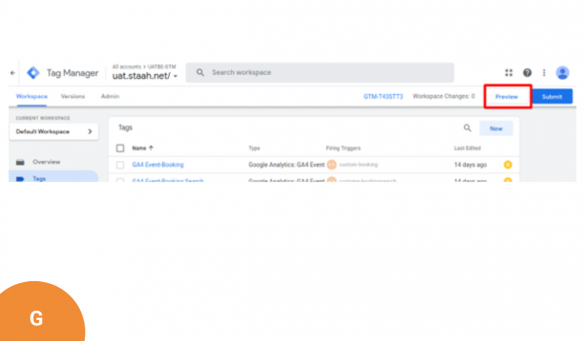
G) Click on the ‘Preview’ button located on the top right-hand sideThe tag manager preview mode window would open in a new browser tab. If it doesn’t then it means your browser is blocking the window.
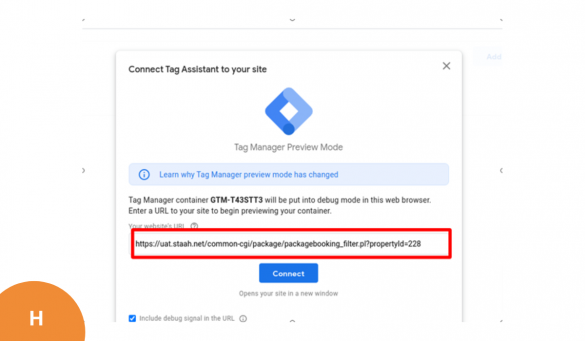
H) Enter your website URL and then click on the ‘Start’ button:Once you click on the ‘Start’ button, a new tab will open in your browser window with your website.
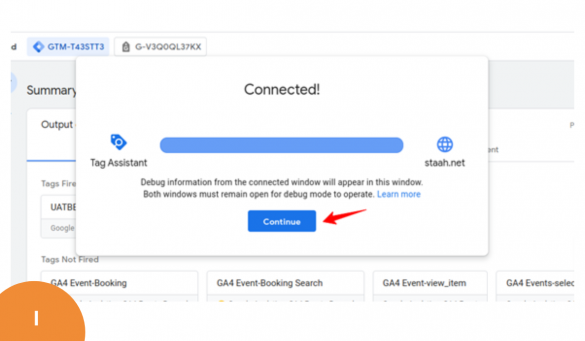
Switch back to the browser tab which shows your tag manager preview mode window and then click on the ‘Continue’ button
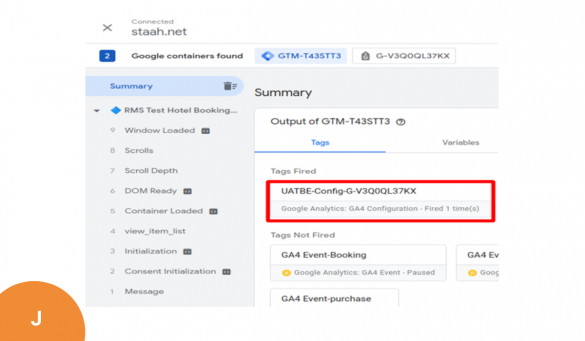
I) If you see the tag UATBE-Config -G-V3Q0QL37KX under the Tags Fired section, it means your tag is firing correctly
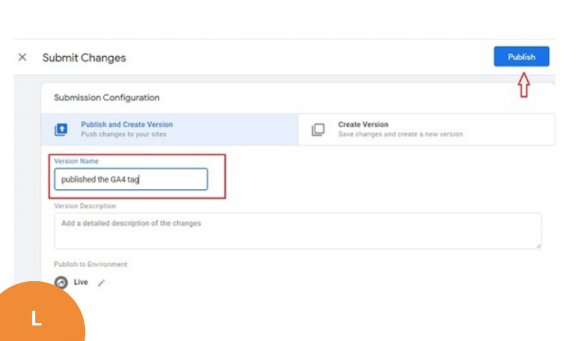
J) Navigate back to your GTM account and click on the ‘Submit’ button:
Give your version a name and then click on the ‘Publish’ button
K) Navigate back to your website and visit a couple of pages
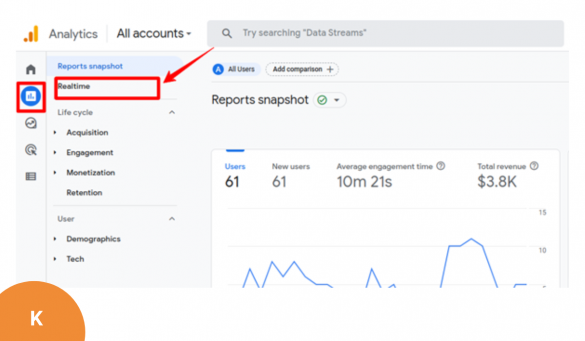
Click on the ‘Reports’ icon on the left-hand side navigation and click on the ‘Real-time’ report.
You should now be able to see new data flowing in your real-time report.
L) Last, but not least, provide the Google Tag Manager ID to STAAH team to configure.
Please find the link for: GTM STAAH JSON Code
If you have further questions please contact your local support team at support@staah.com to assist you
Download this GA4 Document

